
As promised here is a quick “how to” guide for making the dragonfly gift box featured in last weeks post. Although I’m making it to hold a small purse you can use this method to make a box to fit any size gift.
Materials
- A sheet of waste card
- A straight edged ruler
- A pencil
- a craft knife
- double sided glue tape
- a cutting board
- a gift to wrap
- an embossing tool or pair of scissors
Step 1 -measure the gift thickness
Place the gift on the sheet of card with a bit of space around the top and sides and a space the same size plus and extra 1/3rd at the bottom. Measure the thickness of the gift and add 0.5 cm to the measurement. The purse is 2cm thick so I add 0.5cm to give me 2.5cm. Now I draw a line 2.5cm from the edge of the sheet from just above the top of the purse to just below the bottom of the purse. This will form the side of my box.

Step 2
Now I continue the line to the bottom of my sheet making-Side A. Next I draw a line on the other side from the top to bottom of my sheet and another line 2.5 cm from it.This will make the other side of the box- Side B. To make the bottom side of the box I draw 2 lines 2.5cm apart just below the bottom of the purse.
Now I measure from the top of the sheet to the first line below the purse. I note the measurement and then draw a line the same distance from the second line below the purse. Draw another line 2.5cm distance from this. Now you have the top side of your box.
The last line to draw is the edge of the box flap which can be whatever size you like. I like to use 1/3rd of the box size for the flap.

.
Step 3
Cut along the outside line of Side A. Now score along each pencil line with an embossing tool or ,as I’m doing here, a closed pair of scissors. You just want to use enough pressure to dent the card. Lastly cut out the 2 small squares and the sides of the flap as shown.


Step 4
Once you have the template cut out carefully bend and crease along each pencil line.


Step 5
Fold in the side flaps. Cut a piece of double sided tape just smaller than the side flaps and stick a piece to the outside of the two top side flaps Don’t stick any to the top flap.

Step 6
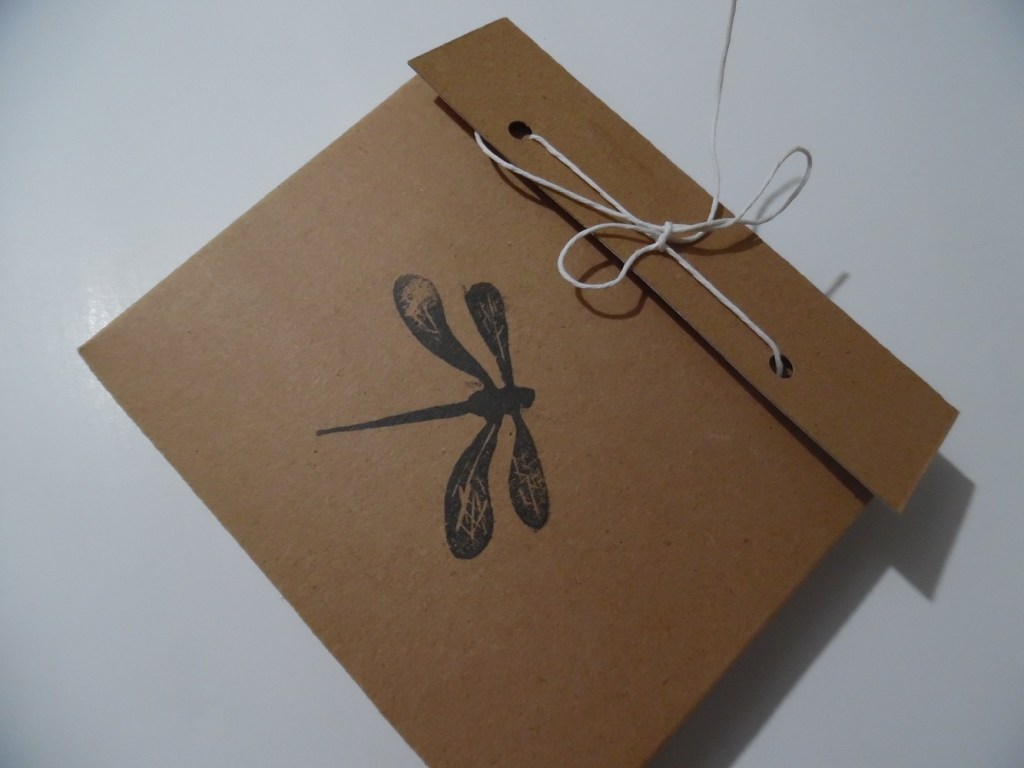
Now is the time to decorate the outside with stamps or other designs. It’s much easier with a flat template than once the box is taped together.

Step 7
Remove the cover tape and firmly press the bottom side flaps to the taped top side flaps. Use your fingers to firmly press the flaps together by putting one hand inside the box and applying pressure from the outside.


Step 8
Put your gift in the box and secure. Here I’ve punched two holes in the flap and the box and threaded hemp cord through to keep the lid closed. You could simply wrap ribbon or string a couple of times around the box to tie the flap closed. You could also get a bit fancier and use sealing wax and a stamp – but I prefer to use a method that doesn’t destroy the box flap when the gift is opened- that way the box can be recycled again.


You can have a load of fun using left over bits of card and decorative odds and ends to make any size gift box. Some things I’m thinking of using on upcoming boxes are seed pods and buttons as closures – I’ll glue on and then attach a loop to the flap by tying through a single hole punch and have a loop closure. I also like the idea of using gum leaves to print the boxes.
I’d love you to share a photo of your own gift box ideas. Happy recycling!

Leave a comment