I shared a tutorial on a hand made concertina sketch book earlier this year which was inspired by a trip to my local art store. Just last week I popped in again and came away with an idea for this years travel sketch journal. Of course the art shop had a lovely little number but at $65 it was a bit pricey – I was recovering from a pre holiday trip to my favourite shop for the well endowed woman in need of reinforced swimwear- the bill was still weighing heavily on my mind ! So instead I bought an $11 sketch pad and headed home. Once there I searched around for cutoffs and scraps and in no time at all had whipped up my own version which will be just right for our trip to Italy ( only 14 sleeps to go!!)

Materials I used
- purchased sketch pad
- mat board off cuts
- pva glue
- elastic
- cutting mat
- metal straight edge ruler
- pencil
- craft knife
- 250gsm kraft card
Step 1. Marking the covers for cutting
Here I’ve taken a piece of mat board which is stiff enough to form the covers. The Front and Back are the same size – the size of the pad. If you want to make your own just adapt the measurements to your sketch pad.
I need to make one of the spines slightly wider – the thickness of the mat board in fact. This will mean the fold over flap will sit comfortably on top of the front cover. I make the fold over flap roughly 1/4 of the front cover width. Now I cut along the solid lines with a craft knife using my metal ruler to keep everything nice and straight.

After I cut this out I decide I want the cover to be slightly larger than the sketch pad because I’m going to add a brush holder next to the pad so I’ll need a little extra space for that . Luckily I’ve got plenty of mat board off cuts so I just cut a new back cover that’s 2cm wider. I do this quite often – redesign as I go – so it’s no surprise to find I have a lot of offcuts!!!
Step 2 Cutting out the front cover windows.
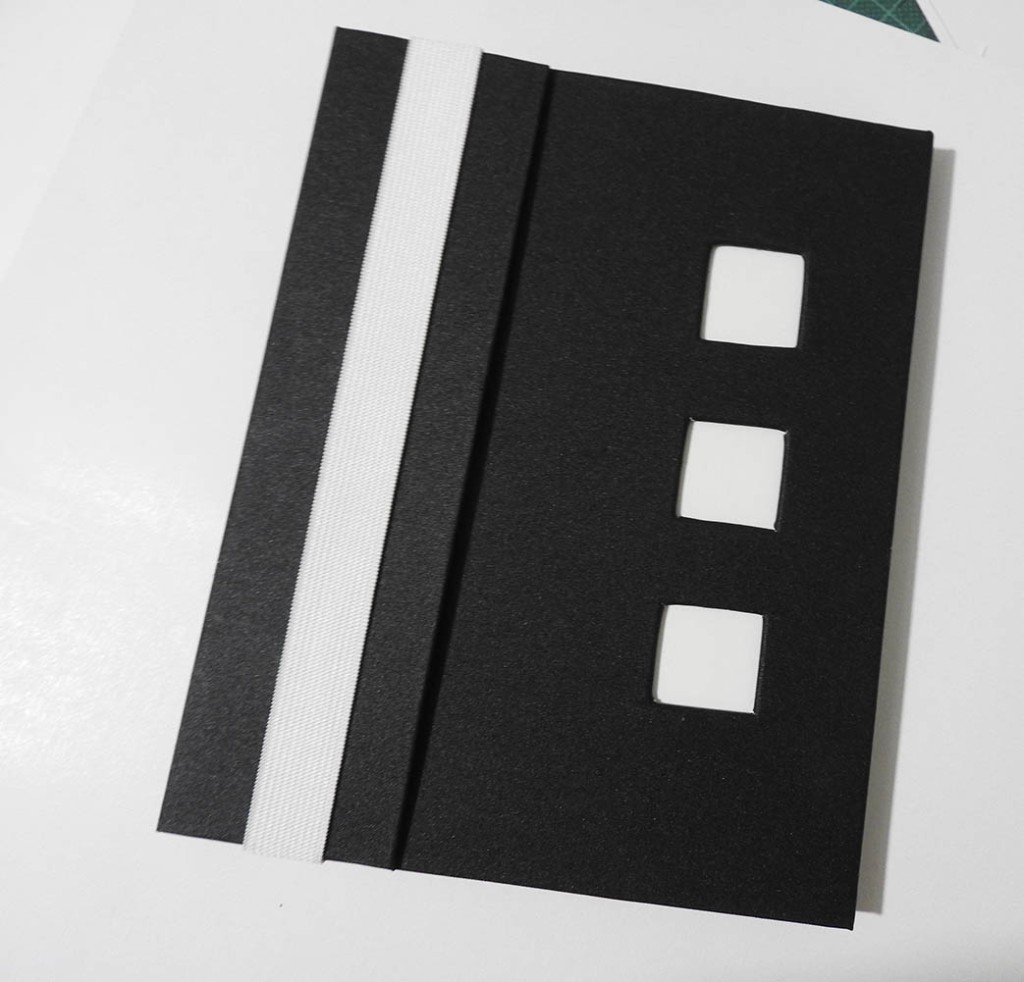
I love having a cover window or two ( in this case three) so I can add some mini paintings later which will hint at the journal contents. I just mark and cut out 3 square windows at equal distance from each other. I leave a larger gap at the bottom as I think it balances out better. You can leave this step out entirely or cut one big window instead if you prefer. This is a great way to personalise your travel journal.

Step 3 Centering the covers and glueing to the cloth.
I take a scrap of bookbinders cloth and lay it face down. Now I assemble my cover pieces leaving a small gap the width of the mat thickness between the cover boards and spines. An easy way to do this is use some matchsticks as spacers . I just eyeballed it. This gives flexibility so the covers will open and close smoothly . ( not the eyeballing – the leaving of spaces!) I mark the cloth 2cm wider than the covers all the way around and cut out. Next I spread pva glue all over the covers and cloth smoothing it out to the edges . Best to put in all on some scrap paper before you do this step but I was in too much of a hurry and so had to clean up the dried glue off my cutting board later! Now I press down firmly smoothing from the centres of each board out to the edges making sure there are no air bubbles.

Step 4 Neatening the edges.
Quickly before the glue dries I turn in the cloth around all the edges and press down firmly making sure it’s snug against the edges. Now I slash from corner to corner in each window frame and glue the triangle flaps to the cover board. pulling tight as I go. Next I glue a piece of thick sketch paper over the windows on the inside of the cover so when I turn it over the windows have little white inserts. At this stage I also use the blunt edge of a knife to run a crease down the gap between the spines and the covers.


Step 5 Adding an elastic closing strap
I wrap a piece of wide elastic all the way around the back cover and cut it 2cm shorter. I butt the ends together and sew with a wide zigzag stitch to secure . I position it 3 cm in from the spine closest to the front flap with the join on the inside of the cover. If you’re wondering what the black oblong is it’s a piece of fridge magnet I used to try out a magnetic closure but it turned out not to be strong enough. Another redesign on the go!
The elastic could be any colour you like as an accent feature. I initially wanted black but only had white and I think it was a lucky thing as the white looks good against the black cover.


Step 6 Attaching the lining paper.
I cut the kraft lining paper to fit inside the covers leaving a tiny 3 mm edge on the black cloth showing. Smoothing out from the centres again to get rid of any air bubbles. I get out the blunt knife and run it down the creases in the spine gaps. The little white thing is a tiny piece of elastic I glued down to the spine to hold a brush or pen. I just cut a slot in the kraft paper to slip over the elastic.

Step 7 Inserting the sketch pad.
Lastly I remove the front cover of the sketch pad and glue the back board to the back cover. I push my favourite travel watercolour brush into the elastic holder, fold the flap over and flip the elastic band to secure it. Ready for Italy!!


This travel journal might seem a bit slim for a 5 week holiday but the 50 pages mean I’ve got one a day with a couple to spare. I’ll be using it for my round up each night and be using a small store bought sketch book for my out and about sketching during the day. Let’s see how it goes!

Leave a comment