
I’ve really got the book making bug at the moment – I tend to go in cycles of enthusiasms that parallel my main painting passion and help to balance out my creative life. Last night I finished my first attempt at coptic binding and I totally enjoyed the experience. I found a lot of useful tutorials online and this one by tortgialla was very helpful in giving me a good idea of how it’s done. Any faults in my stitching are down to me not the well photographed and clearly written instructions in the tutorial!
The Cover
I’d made covers before so that wasn’t too difficult. In fact I made a double cover because I wanted it a bit thicker , so I just covered two pieces of mat board with different fabric and then glued them together and weighted them overnight to make sure there was a strong bond.


The signatures
I’ve learned a whole new vocabulary swotting up on book binding – that’s one of the things I love about diving into new crafts. It’s like I’ve now got the secret password to an exclusive club. I can decode the articles and tutorials and understand the nuances of specialists writing about their passion. So I now know that a signature is not only a written name but is also a collection of papers stacked on top of each other and folded in half. A number of signatures together make up the inner pages of a book. Book is a term I already knew in case you were curious.
So I made up six signatures with each having 4 sheets of ivory Mi Tientes pastel paper.

The tricky bit!
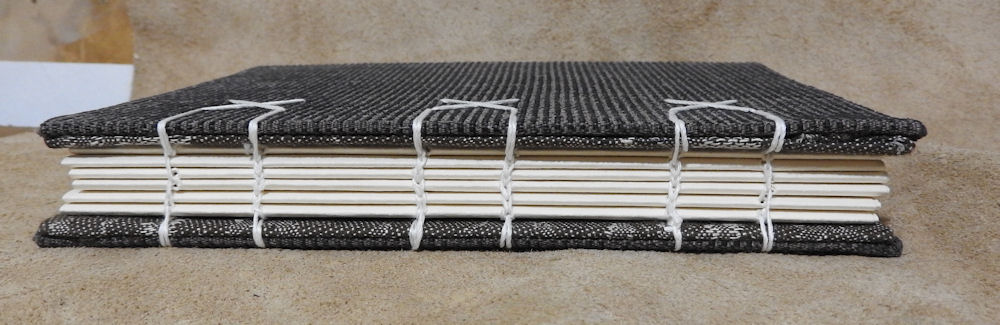
Now I had to join the signatures to the covers and to each other and that’s where the coptic stitching comes in. If you want to know more about how to do this there are plenty of online tutorials and videos . What with threading and re threading my needle, holding covers and papers tightly, manouvering the needle while holding the paper and the covers tighty, while also pulling the thread tight, and putting band aids on fingers after mistaking flesh for paper there wasn’t much time for taking photos! You might have noticed there’s a bit of an emphasis on keeping everything tight! This is because you want the pages to be snug against the covers and each other so the book doesn’t move around too much. Mine is OK for a first attempt but I think I need to keep it all a little it tighter next time – not sure how I’ll do that but I expect it’s like everything else and just requires a bit of practice.
Stitching to the cover was quite tricky , especially as I tried a bit of a fancy pattern for my first attempt. Once that was done the signatures were plain sailing and not fiddly at all – I think this was helped by using a curved needle which was a tip from the tortagialla tutorial.


The IT Geek wanted to know was it worth all the time it took and I gave a resounding YES. It’s a very satisfying thing to create your own book and even more satisfying to then fill it with your prose, poetry, and art. I’m going to make a library of them – there’s a ton of different stitching patterns out there and I may well have a go at creating my own. Then there’s the long stitching method of attaching the signatures directly to the spine of a leather cover – I’d like to try that as well. …and maybe some wooden covers ………..

Leave a comment