
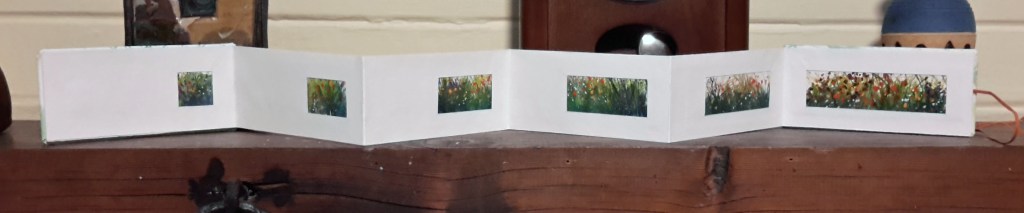
This concertina artist’s book displays mini garden paintings in graduated windows on each page. You can cut any size window you want but I like the way this book seems to zoom out from the flowers to the full garden as the windows get progressively bigger.
Materials:
fabric scrap or piece if scrap canvas decorated in any way you like ( I used acrylic inks)
PVA glue ( preferably acid free)
scraps of thick mat board or other card for covers
straight edged metal ruler
craft knife or mat cutter
cloth tape
watercolour paper- you will need a sheet approx 100cm wide
length of ribbon or cord

Step 1 Make the covers
Cut 2 pieces of card the same size . Mine were 5 x 15cm. Cut two pieces of your cover canvas or fabric 2 cm larger all round and then cut the corners as shown so you don’t have too much fabric to fold under at the corners. Spread glue on the face up side of the covers and use a scrap of card to squeegee the glue all across the surface of the card so it’s smooth. Turn the card over and centre on the fabric and smooth out so there are no wrinkles.
Fold the corners in neatly and then tear off strips of the cloth tape and tape leaving 1 cm all round free of tape
On the back cover lay a length of card/ ribbon accross the cover side to side and tape over it. The tape should be 3 times the width of the cover.
The front of your covers should look like this ( only not bluury!)
Step 2 Prepare your paintings
Now make sure you have 6 mini paintings ( or poems , or cut outs – whatever you like) that will fit in the windows you’re about to cut. I did flowers but it could be anything you like.
Step 3 Measure and cut your paper.
Now you need to measure your covers and cut a length of watercolour paper that is
LENGTH =(the width of the cover – .5cm) x 6
WIDTH = ( the height of the cover -.5cm) x 2
Step 4 Mark and fold your pages
Once you have cut the paper fold in halve bringing the long sides together. Crease the fold with the back of a bread and butter knife . Open up your paper and mark six equal sections along the length of the paper strip.
Step 5. Cut the windows
Now you can cut the windows on the top half of the sheet however you like. I cut mine starting 1.5 cm in from the pencil marks leaving 1.5 cm border at top and bottom of the folded half. I increased the length of each window by 1.5cm.
Use a metal ruler and a craft knife for cutting the windows.
Now fold the long edges together again.

Step 6 Position the paintings
Next match up your 6 paintings with the 6 windows and try them inside for positioning. I marked around the corners with pencil so I could position them again easily.
Step 7 Fold the pages.
Then you need to fold the strip of paper at each of the 6 sections you marker earlier. Place the metal ruler on the left of the first section mark and fold the right length of paper over the ruler to the left and press the crease. Now lay the ruler on the right of the second section mark which will line up with the start of your paper strip. Fold back over the ruler to the right. Continue the rest of the folds going in opposite direction for each fold. You will end up with a concertina strip as below.
Step 8 Glue in the paintings
Open up the strip and glue all along the non window side spreading the glue smoothly with a piece of card. Also place a bead of glue around each window. PLace the painitngs in the pencilled marks you made earlier , fold the strip long side to long side and smooth down to make full contact with the glue. Smooth out any wrinkles or creases. It should look like the photo below.

You can make sure your page folds are crisp and smooth by ironing them with a warm iron.
Then I sandwiched them between some card and placed bulldog clips around until they set.
Step 9 Glue pages to covers
When fully dry cover the inside of your cover with glue, smooth out and then carefully position the front page painting side up on the front cover leaving an equal distance from the edge around all sides.
Do the same with the back page and back cover.
Leave for a few minutes then fold up the concertina book , wrap the cord around it twice and tie up.
Step 10 Weight down for 12 hours
Now place under a heavy weight such as a brick or stack of books for 12 hours and you’re all done!
Step 11 Enjoy!


Why not try one yourself and send me a link to your art book? I’d love to see where your imagination takes you.

Leave a comment